Submitted By: BLueSSDate: November 27, 2010, 01:49:33 PM
Views: 55753
Originally Written by Suko
Dance Dance Revolution, In the Groove, Pump it Up, and most other arcade games that emphasis stage dancing all use a relatively similar design. The pads on the US release of DDR X machines will likely be similar in sensor placement to this tutorial, but the overall design of the pad may vary significantly from the descriptions offered in this article.
Because of the popularity and how common DDR machines are, this tutorial will describe how to access and clean a Dance Dance Revolution arcade pad circa 2001.
Contents 1 Items You Will Need 2 The Arrow Panels 2.1 Removing Sensors 2.2 Cleaning the Arrow Cavity 2.3 Cleaning the Brackets 2.4 Cleaning the Sensors 3 Panel Cleaning 4 General Cleaning 4.1 Cleaning the Brackets and Metal Panels
Items You Will Need Some things you will need: Phillips-head or Metric screwdriver (check your machine to determine which screwdriver you'll need) flathead screwdriver vacuum cleaner rags or paper towels WD40
The Arrow Panels It is important to use the correct size screwdriver when removing the screws from the pad. Using the wrong screwdriver can strip out the heads and otherwise damage the screws.
The first step is to open up the arrow panels. Cleaning and maintenance of the arrows likely has the most direct effect on gameplay. Each arrow panel is secured by four corner brackets. Each of these brackets is mounted with two Phillips-head screws (metric if it's a PiU or ITG machine). These are 6mm x 10mm screws and you should use a #3 Phillips-head screwdriver on them.
Remove each of the screws with a screwdriver. The power screwdriver or drill can really save you time on these as there are a total of 64 screws securing the eight arrow panels. To remove the brackets, I found that pressing down on the inside edge makes the outside corner stick up. Try to lift the bracket straight up as much as possible. If it gets at too much of an angle it can be difficult.
Once all the brackets are removed, you can remove the arrow panel itself. Sometimes you can just lift it out with your fingers, but you might need the flathead screwdriver to pry it up a little bit. Don't dig the screwdriver down too deeply as the sensors are right underneath the edges and you don't want to stab or pry them with the screwdriver.
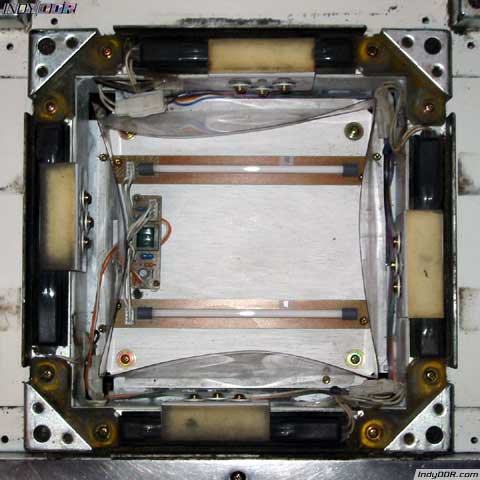
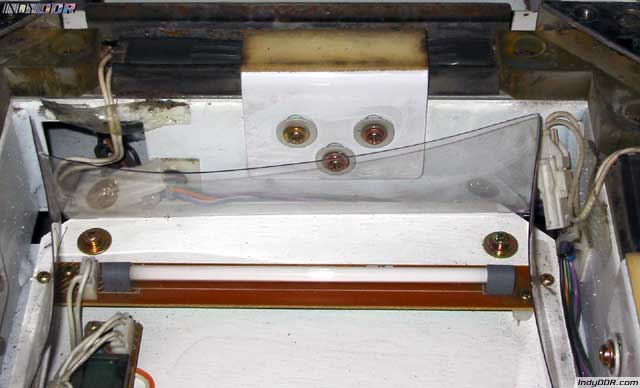
Removing Sensors Now you should be able to look at the inner workings of the arrow. There should be four sensors, one on each edge. The center of each sensor should be covered by a metal bracket with a little foam padding on top of it. In addition, there should be some wiring and a plastic dust shield protecting the center of the compartment where the two lights are installed.
You can remove the sensors by sliding them out on the side where the wire comes out. Be careful not to bend the sensor too much as you do not want to bend or break anything inside it. I've found that this can be done either with or without removing the bracket above it first.
Cleaning the Arrow Cavity Vacuum out all the dirt that has accumulated inside this compartment. Make sure you check around for any parts (especially screws) that are loose or have fallen out before you do this as you don't want to vacuum those up too. You might need the flathead screwdriver to scrape the dirt out from the space between the sensor mount and the edge of the compartment.
After you've removed all the loose dirt, you can wipe down the inside of the compartment with a rag and some Windex. I suggest you spray your rag with the Windex rather than applying it directly to the surfaces so that they don't get too wet. Be gentle when wiping down the light tubes so you don't break them. Also wipe down the underside of the arrow panel. You'll be surprised how much brighter the arrows will glow when you've wiped all the dust off the panel and the lights.
Cleaning the Brackets Many player's have experienced the problems of Sticky Arrows. The culprit is almost always the brackets getting stuck in the depressed position. This can be caused by the brackets missing screws or not lubricated enough.
First, check to make sure that all the screws holding the brackets over the sensors are present and tight. In my experience, loose or missing screws here are the leading cause of sticking arrows.
Each screw should have a little metal spacer on the shaft and a washer between the head of the screw and the bracket itself. This design allows the metal bracket to float when the screws are installed. In other words, the bracket should be able to wiggle and move - this is normal. If it cannot move, you are likely missing the metal spacer on one or more of the screws.
These are 4mm x 12mm screws and you should use a #1 Phillips-head screwdriver on them. I do not recommend using a power screwdriver or drill on these screws. It would probably be too big to get in this space anyway and the screws are pretty small and you wouldn't want to apply excessive force to them.
Tighten the screws snugly, but don't over tighten and strip them. These screws will have a tendency to loosen with the vibration of gameplay, so it's not a bad idea to check them periodically.
After putting the brackets and screws back in place, apply a small amount of WD40 at the locations where the bracket and screws come together. This will help make sure the bracket can move freely and is less likely to get stuck. You don't need to use a lot of lubricant. Just a little bit in each screw location will be enough. Make sure to wipe off any extra lubricant that might have gotten onto the other parts of the arrow cavity.
Cleaning the Sensors If one or more of the arrows has been having trouble holding freezes, or it tends to miss rapid steps or light presses, you might have a weak arrow or a weak sensor. try using the business card trick on them and see if you notice any improvement.
Make sure to clean the grooves that the sensors sit in and vacuum out any dirt, grime, or muck that has built up in that area. If you want, you disconnect the sensors and wipe off the sensors with a damp cloth to make them factory clean. This is generally considered unnecessary and does take a substantial amount of time.
Finally, check to make sure all the connections for the sensors are tight, although I doubt you'll have too much trouble with them. They're all locking connectors and aren't likely to come loose under normal usage.
Panel Cleaning Now you can move on to the stainless steel plates, if you desire. For the most part, cleaning these plates and the compartments under them probably won't affect the performance of the stage that much. However, plenty of gunk can accumulate there nonetheless and a good cleaning certainly won't hurt and can make the stage look spiffy.
Each of the plates is secured with four of the same 6mm x 10mm screws that are used to hold the corner brackets on the arrow panels. Once you remove these screws, you can lift the plate up. You may need the flathead screwdriver to pry it up a little, but be careful not to scratch or dent the panel.
Underneath each plate is a structural plate that is mounted with four more screws. These screws are 5mm x 10mm screws and you should use a #2 Phillips-head screwdriver on them. Remove these screws and then lift the plate up.
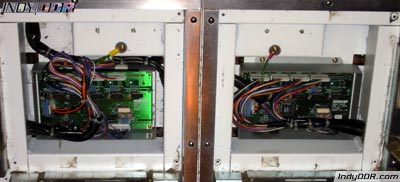
There's some wiring underneath the center panel on each side of the stage and there's a circuit board underneath the plate to the right of the up arrow on the Player 1 side of the stage and to the left of the up arrow on the Player 2 side of the stage. There's nothing else of much interest under the remaining plates.
General Cleaning Once you've removed both the top plate and the structural plate, you can vacuum out any dirt inside the compartments. You may also wish to wipe them out with a rag and Windex. However, I wouldn't recommend spraying or wiping the circuit boards. I'd say just lightly vacuum them or blow any debris off of them with a can of compressed air.
You can check the connections on the circuit boards to make sure they're tight, although I don't think you'll have very much trouble with these coming loose either. Be sure not to press too hard on the circuit board so you do not bend or break it.
Cleaning the Brackets and Metal Panels These parts can be cleaned in the dishwasher with regular dish soap. DO NOT put the arrow panels in the dishwasher. The hot water is likely to damage the decals and the lexan panels.
Make sure you put the screws in a wire mesh container, or something similar so they won't get lost in the wash. Make sure everything is dried thoroughly before you start to reassemble the pads. Even a few drops of water can corrode metal if left trapped inside the machine with no where to go.
Now you're ready to reassembly the dancing stage. Throughout the process make sure you don't over tighten the screws. Tighten them until they're snug, anything more than that and you risk stripping the screw head or making it difficult to remove the screws in the future.
At this point, you're all finished! You stage should look great and may even play better as well (if it was having some trouble beforehand). Play a few games to make sure that everything is working correctly or optionally check each of the sensors in each panel with the Input & I/O Test in the service menu.
If you're still confused, I put together a video that walks through fixing common problems on DDR pads and how to clean them. Sorry that I ramble a bit in this video, but it does cover nearly everything you need to know.